Showing posts with label card. Show all posts

Pop Gun Penny Slider Card Tutorial

Beth from Beth's Beauties here, and today I am sharing the tutorial on how to create the pop gun penny slider card created by Snapdragon Snippets.  It is available in the Silhouette online store (#45884) and in the SVG Attic store as well.

The picture below is the layout of all the pieces included in the file.
This picture shows two options of assembly.   You can choose to use the three pieces with holes to attach twine to the pop gun or the ones without will still create the sliding action without having twine attached.  Discard the set you do not use.
To create the slider, you will need two pennies with a pop dot.  Make sure your pop dot is somewhat circular and it fits easily in the slot in the card front.  I had to cut mine down some.
Place one penny with the pop dot attached behind the card front layer.
Then center the second penny on the front of the pop dot, pressing them together firmly.
This is what the slider should look like from the side.
Place the card front layer face down and add foam tape over the entire back, making sure you stay far enough away around the open area so the penny can move freely.  I just used the negative space from my sheet of circular pop dots for this.
Flip the front layer over and attach it to the front of the card base.
Next, assemble the gun using the layout of the pieces visible in the first picture.  The picture below hows that I am using the pieces that will have the ball attached to the gun with twine.
I used 4.5"of chocolate truffle trendy twine to connect the ball and gun.  Add the ball to the penny with a glue dot.  This is what the ball looks like in the down position.
Here it is in the up position.
Add the wording and embellish as desired.  I used vinyl for the "that's some" wording on this card since it already has an adhesive back on it.  The other words I used thin foam tape underneath for a little extra dimension.
Here is a look at the completed card!
I hope you have a wonderfully crafty day!

Tutorial: Bat Easel Card

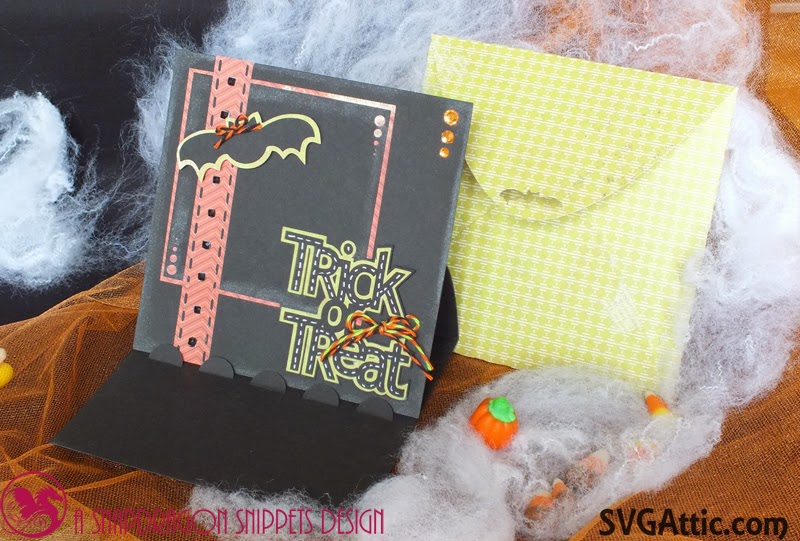
This is a tutorial for the bat easel card that is part of the Halloween Soiree kit at SVG Attic.  The picture above also shows the coordinating envelope that will be in that kit.  The card is also available in the Silhouette Store

Here is a view of the different pieces that are included with the easel card.  I cut the base, card front, upper decorative square, upper bat and upper Trick or Treat pieces out of black cardstock.  The faux ribbon and background decorative square are shown in a orange print cardstock and the shadow bat and Trick or Treat pieces are cut from patterned green cardstock.

Start with the base piece and fold both of the score lines towards you.

Bend the cardstock at the inner score line so it creates a 5" square.

Add tape runner to the area just below the score line visible on the front.

Place the 5" square card front on top of the base, lining up all sides.

Open the card up and bend up the scalloped tabs that are cut in the base.

Place the card front behind the scallops.  This is how the base of the card should look.  Set the base aside for now to start on the decorative layers.

Layer the black decorative square on top of the orange square with tape runner.

Next layer to add is the green Trick or Treat shadow piece.

Then add the black Trick or Treat layer.

Now bring back the card base that is folded and adhere the decorative layers to the front.

Using liquid adhesive attach the faux ribbon piece towards the left side of the card front.

Next, layer the black bat layer on top of the green shadow.

I added foam squares to the back of the bat, for extra dimension, but you could also use liquid adhesive.

Add the bat to the top left corner of the card.

Add whatever embellishments you want and your bat easel card is finished!

Here is a close up of the embellishments that I added to the card front.

I hope you have a wonderfully crafty day!
Beth
Beth's Beauties

Thank you card tips | Card box set

I am back as promised to share some tips on how I made my pretty flowers go from flat to fabulous!


This was flat:
The leaves:
First, I inked the leaves using distress ink, but you can use any chalk ink as well. Note that I only inked the edges so that I would not see the paper's white core. I did not want to change the color of the leaves. But you may.

Next I pierced tiny holes every 1/8" to add stitching.
Here I hand stitched using a needle and thread.
Below you can see how it looks by drawing a line with a pen following the pierced tiny holes.
Finally I adhered the leaves to the base using dimensional foam and "played/handled" with them or lifted the sides and/or edges with my fingers.
The purple flowers:
Below you see me using the "ball" of the inking tool's handle. This process worked best then using the special tool.  I just went over the center of the flower in a circular motion adding light pressure.
I don't have a picture but I finished the purple flowers by adding a "bling" to the center of each flower.

 The orange flowers:
First I inked them using distress ink.  I used a circular motion starting from the mat "into" the flowers.  This process helps to not leave visible ink marks.  You can see how the color changed by looking at the flower on the bottom right of this picture.
 Here again using the handle of my inking tool I was able to give them a "lift".
 I used regular glue to adhere the first two layers.  I then added dimensional foam to adhere the third or center layer to the flower.
 But I first added the "bling" to the centers.
The white flower:
I used a little bit of distress ink.
 I cut strips of dimensional foam to put all the layers together.

I finished them all by adding them to the card using yet more dimensional foam.

And I ended up making them into a set and creating a box to fit them all in and give them as a gift.


Files Used:
  "Bloom!" flowers 5x7 greeting card
You can find this file as a single file on the Silhouette online store HERE
or as part of a garden set HERE at the SVGAttic site.
Scalloped Edge 3D Box

Thanks for stopping by!
Tomorrow we are starting our month long Anything goes contest! Come back to get all details and enter for a chance at some awesome prizes!

Bloom Thanks Card

This is Gaby here today to share a card.
I just loved this colorful design so much that I had to create something with it.


Close up of the flowers and bling...
 Instead of using the included Bloom cut file, I opted to use a stamp.


Come back on Wednesday to take a look at how I take this already pretty design/cut file from
 flat to VavaBoom!!
File used: "bloom!" flowers 5x7 greeting card
You can find this file as a single file on the Silhouette online store HERE
or as part of a garden set HERE at the SVGAttic site.

Scheduled events for this week:
Wednesday - tutorial/tips on card above
Thursday - we kick off our month of May Anything goes contest -- you don't want to miss the awesome prizes!!

See you on Wednesday!
Gaby


Related Posts with Thumbnails