Silhouette has the wrong file for this box, so if you are in desperate need of this, please send me an email titled "3D Manger" to snapdragonsnippets(at)gmail(.dot)com and I will send you back the correct file.
3D manger tutorial
3D NoeL phrase by Jodi Warner
And another darling 3D phrase for the holiday from Jodi Warner. Head over to
for the tutorial of how she created this:
She used these shapes from Snapdragon Snippets (just click on the photo to visit the link):
This is a preview of the 3D Manger that will be out sometime the week of Dec. 3rd.
She also used the 3D Bell Ornament by Samantha Walker (Design #35624)
I can't remember who did the holly leaves, but there are many to choose from if you wanted to create this same holiday decoration.
a Joyful creation
So why did I not get my mother's genius staging and accessorizing creativity?! I'm an artist, so you'd think all creativity would come natural. Um, no. When it comes to decorating and enhancing the basics, my Mom has me trumped there. Here is a peek at her latest project.

I love her color choice and fun objects.
This uses a combination of some of the artists that license their artwork to Silhouette. For example, the cute lights are from Loni Harris, christmas wreath is from Jamie Koay and the star is from Lori Whitlock.
And of coarse the letters are from me!
Jodi modified the "Letter U box" to make a "J" that would allow a platform for the 3D tree. You can see how she modified the design on her blog
Needles 'n' Knowledge.
Needles 'n' Knowledge.
Be sure to check her post out and other great inspiration on her blog!

3D alphabet tutorial by Sarah Traub
Hello all! One more quick post.
I realized that I posted about the great video tutorial by Sarah Traub on our FB page but forgot to post it on the blog too. So for those who have not seen it...check it out on Youtube. Sarah does a great job of walking you through building the letters for "FALL". This will give you the basic idea for the rest of the alphabet
and hopefully answer many of your questions.
and hopefully answer many of your questions.
As she points out in the video, there is one mistake in the letter "A". There is a piece that needs to be reversed. So, please keep an eye and ear out for that. Without further adieu...Sarah Traub!

3D Cornucopia Part 2 plus inking tutorial
This is PART 2 of the 3D Cornucopia tutorial.
In this tutorial, I quickly cover applying the accent shapes and finishing touches that I used in my sample.
We ended the last tutorial with just the basic form.
It by itself, could be used for decorations or as a gift. If you want to add a little more though, I've provided some accent shapes to dress it up even more. You could mix up the strips in different papers to jazz it up even more than I have.
Cut the accent shapes.
I cut my accents from a cream paper with a burnt sienna colored design.
After cutting them, I inked the edges of each piece.
Inking mini-tutorial.
Here's a mini tutorial for how I ink my papers. I'm no pro at this so please don't think this is the way you must do it. There are many techniques, and this is just how I've found to do it. I'd love to hear what your techniques are too!
To ink the easy to access edges of the paper, I simply hold my paper in one hand and brush my ink pad from inside to outside softly a couple times until I acquire the darkness I want. I go from inside to outside instead of side to side. I find that I get a softer, more gradual gradient change this way.
To ink the small cuts like the circles in this shape, I lay my shape on a scrap piece of paper. Then I take a cue tip and dab a little ink on the end. Then carefully dab or brush my paper to the desired shade. I find that it's best to only put a little ink on my paper at a time. This way I don't darken the edge too much and still get that soft gradual color change.
In my sample, I used Colorbox's Classic Pigment Cat's Eyes. These are definitely not my favorite inks to use, but I can use my JoAnn's coupons to get them for a good price and they come with 6 colors and stack nicely saving space.
I used the "Cocoa" ink for this project.
So to continue with the assembly tutorial...
Adding the cornucopia rim.
I didn't show this shape up above, but you should be able to find it in your file.
The shape that looks like an arch with scallops on both sides is the accent for the rim of the Cornucopia.
Start from the center!
When applying the rim, be sure to find the center of the rim shape and where it coincides with the actual rim. Because of the curve, if you don't start in the center when adhering this piece, it won't fit right. So glue the center and work your way around each side, lining up the outer scallop edge.
Center the largest accent.
Starting with the reverse scalloped accent, center it on the largest ring of the Cornucopia. Again, be sure to start from the center.
The accents for the largest three rings will only go to the perforation marks since they won't be seen on the bottom. The rest will fit around with a small gap at the back.
Continue adding accents and your done!
Now fill with wax fruit, paper fruit or real fruits and veggies
and enjoy at your feast this November!

3D Cornucopia
This is a tutorial for assembling the 3D Cornucopia die cut that can be found in the Silhouette Online store. For more information about the Silhouette Cameo and other products from Silhouette, click HERE.
To start, cut your body of the cornucopia.
I cut mine from medium weight brown cardstock. Light weight also works great for this design.
*Because there is such a tight curve at the end of the cornucopia, I suggest that you stay away from really heavy cardstock. Otherwise your paper will crease instead curl.
Apply adhesive to the underside of the shape with the small "half" tabs as shown in the photo below.  |
Glue the two halves together.
Line the small half tabs up with the full small tabs. You should be able to see the half tabs on the correct side of the paper. This will be important later on.
Curl your cornucopia.
Next, to help create your cone shape, you will want to put some curl in your cornucopia by pulling and rubbing it on the edge of a table as shown below. It's kind of like curling ribbon with scissors except that the table edge is your scissors and you're curling the paper around the small point.
 |
| In the end, you should get a half cone shape like above. |
Shape cone point.
To further shape the point of the cornucopia, form it around the tip of pen or pencil.
Along the edge of the long tab are a couple of what look like far spread perforations. These are guides for glueing the two remaining ends of the cornucopia together. They are NOT a fold line, just guides.
Start to make your cone shape.
To start to create your cone shape, start on the wide scalloped end. Line the non-tabbed side up with the "perf" cut lines that were mentioned above.
Once you have that last step done, you are to the hardest part of the whole assembly, forming the point of the cone!
Finish connecting the two sides above
all the way to the point.
You will most likely have to squeeze your fingers through the slats to hold the seam together until it dries. I repeat, this is the most difficult part. If you can get this, the rest can be done.

Create the curve of the Cornucopia.
Now to start to form the curve of the Cornucopia. Apply adhesive to the tab closest to the point. It is very important that you start with the this tab, otherwise you won't be able to put the pressure on the connection to get it to stay.
Attach tab to next ring.
When I mentioned above that you needed the "half tabs" on the outside, this is the reason. You will line up that center line with the center line of the ring next to it. Reach your finger through the next slit to hold the joint together until the glue has dried.
Repeat with next tab.
Continue with next tab, adhering it to the next ring. All the way down to the last slit.
Repeat for every tab.
This is your basic cornucopia shape.
Keeping the Cornucopia upright.
One last thing to complete the basic shape. There are perforation lines on the bottom of the largest three rings. This is to help form the cornucopia to stay upright. Crease these perforations by holding the cornucopia or place it on the table and press from the inside.Ta Da! Basic shape complete!
Because of the length of this tutorial, I've decided to split it into two parts.
Part 2 will cover the accent shapes and final touches.
Please click HERE to go to PART 2 of the 3D CORNUCOPIA TUTORIAL.

Basic 3D Letter Box Instructions
Here's a quick explanation of how to put the Letter "K" box together. A better tutorial is coming, but for now, I hope this will help answer some questions. If you are putting together a letter other than the "K", please read through this, as most of it will apply to you as well.

When you bring your file in, zoom out until you can see all the shapes.
I've divided it into four sections that are labeled: "Accent shapes for lid", "shapes for lid", "Accent shapes for base" and "shapes for base". I would ungroup them and set aside the accents for both the lid and the base. I cut all the lid and base shapes from the same solid colored cardstock.
BOX BASE
- First, work with just the base shapes. Do you see the little circle, square and triangle shapes that are on the end tabs of each shape? (I don't think the shapes are included in the first couple of letters and the actual shapes to help might also be a heart, or a diamond or some other small shape.) These are there to help you know what attaches to what. Make one long strip with the three tabbed strips by matching the shapes up. (Number of strips differs from letter to letter.)
- After you have done that, find the long side that matches the long side of the "K" and attach it to the edge of your "base K shape". Then work your way around the letter attaching the tabs to the base "K" shape.
Repeat the above with the Lid shapes.
ACCENTS
- The accent pieces correspond to the strips. So the column of accent pieces for the lid on the left, correspond to the lid strip that has a circle on one end and a triangle on the other. The middle column of lid accent pieces correspond with the rectangle/circle lid strip, and finally, the right column of lid accents go with the rectangle/triangle strip.
- Center the accent that corresponds to it's plain on the box. These are optional. You can use all or just a few. If you see the "SPOOKY" that was featured on Silhouette's blog by Jodi G. Warner you'll notice that she only used the front accents. The photos in Silhouette's store of the letters uses every accent. It's up to you.
*Word of Advice: Try making it out of type paper first. When I create the prototypes, I scribble on one side of type paper so I know what is the right and wrong side. Once you do one, you'll have the hang of the other letters.

3D pilgrim hat tutorial
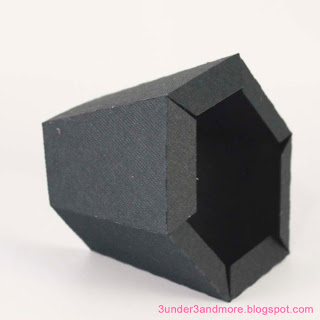
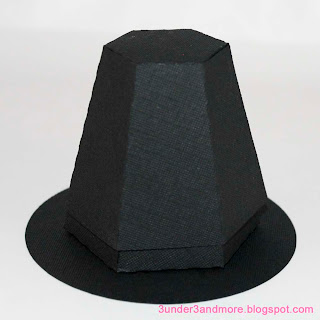
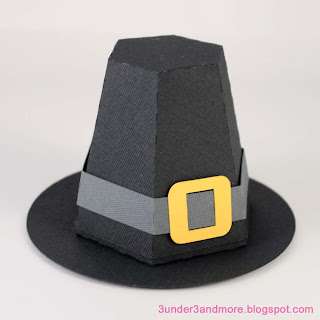
This tutorial is for assembly of the 3D pilgrim hat box die cut that can be found on the Silhouette Online Store.
 |
| First, all fold lines fold in toward the wrong side of the paper. Above is about what your lid will look like when all folds fold in. I prefer to crease all folds before I start assembling. |
 |
| I then applied a liquid adhesive to all the tabs. |
 |
| And then careful worked my way around the hexagon attaching the sides of the lid. |
 |
| When finished, your lid should look like this. |
 |
| Next, attach the tab on the base to the other end to form a hexagon as shown. All tabs should be bent inward. |
 |
| I place the base inside the lid to help it keep it's form as I attach it to the brim. |
 |
| Next, apply your adhesive to the tabs. |
 |
| And carefully, center it on the brim. |
 |
| Press down gently on the top to be sure that the base is sticking. |
 |
| Reach your fingers in and press on the tabs to be sure they are secure to the brim. |
 |
| Create another hexagon shape with the belt by glueing end to end. |
 |
| Apply buckle to belt with a little adhesive. |
 |
| Slip the belt over the lid and your finished! Now fill with goodies and you have the perfect Thanksgiving party favor! |
Subscribe to:
Posts (Atom)


