3D Basket Tutorial

These fun little baskets are great for gifts and are pretty easy for the most part to assemble. There are a few tricks to assembly though, and I'll show them to you hear in this tutorial.
First of, cut your basket out with your Silhouette. I suggest a lightweight to mediumweight double sided cardstock with different patterns or colors on each side. (If you're new to my blog and don't know about the Silhouette, go to http://www.silhouetteamerica.com/.) There should be a total of two pieces that you'll need, the body of the basket and the handle.
1. Start off by folding over the basket rim. If you lay your basket body on the table as I have in the video, then the pattern that is face-up will be the main basket, and the pattern face-down, will be your rim.


2. While rim is folded over, fold at perpendicular perforated lines towards the inside of the basket.


3. Unfold and open the basket rim. We're now going to put adhesive on the inside of the rim so that once assembled, it will stay together. I just use a double stick adhisive tape runner for mine.

*add your adhesive to the areas shown circled in PINK. Be sure NOT to put adhesive in the areas circled in YELLOW. If you add adhesive to the areas circled in yellow, it will be difficult to add your baskets handle.  

4. there are two section of the rim, a short section and long section. Start off with the short section. Take the corresponding base section and line the top edge with the fold going down the center of the rim as shown:

5. Carefully fold the rim back down on top of the two sections completed.

 6. Now keep the two layers of the rim slightly open so you can slide the next section into place making the top of it hit the fold crease of the rim. The sides of the section should also line up with the perpendicular fold marks you made earlier. (Where it's been perforated.)

 7. Repeat step #6 for the last section and your basket should look like this:

 8. Now it's time to tuck the tabs under the rim. This can be a little tricky because of the adhesive we put on earlier. But once you get it in place, all you have to do is finger-press it together and it won't budge. Much easier than trying to push adhesive in their after.
 

 9. Last portion is inserting the basket's handle. Along the rim, their are narrow rectangular holes. Slide one tab of an end of the handle into the hole and gently wiggle the other side down into the whole. These tabs make it tight and a little difficult to get the handle in but keep it from sliding out once it's in.


 10. Repeat step #9 with the other end of the handle and voila, you're finished.

 Now fill plastic grass or paper shreds and add some candy! The perfect party favor or gift.

Don't just use for Easter though, it's great for baby showers, bridal showers, holiday gifts, birthday favors. The list goes on!



Taking a Ride of a Lifetime!

It's been awhile since I've previewed Silhoeutte dies. So here is a new series I have coming out. I absolutely LOVE rollercoasters and all thrill rides. For the last 4 years though, I've been pregnant and couldn't ride them. I missed out on our trips to Disney World, Disney Land, MGM Studios, Epcot, Six Flags and a few others. So, when we took the kiddos to the little Trafalga near my parents on one of our last vacations, I soaked up every minute of their little kiddie roller coaster! Lame, I know. But it's been 4 years! I can't wait to scrap those fun memories with these new Fair / Amusement Park designs.
Next stop for me I hope someday, CEDAR POINT! (Best rollercoasters I've been on, try the Wicked Twister if you're ever in Ohio!)


If you've ever been to Lagoon in Farmington, Utah, then you know of the Rocket. (Love it!)
A few of the places that we've been lately that have kiddie rides all seem to have a kiddie version of the Rocket. My 4 year old could ride it all day! The one he's loves is called the Frog Hopper. It only goes about 20 feet in the air and doesn't go real fast, but boy does he love it! This design is for those fun adventures.


I made the design below so it could also be made into a border. Simply place multiples of the design next to each other to make your own bucket sky ride across your page.

Enjoy!

Adventures of 3under3: Pasta necklaces

So we're back from visiting my folks. It was great!...but...I don't think I want to travel with 4 young kids for a little while. What an adventure! I swear the kids acted like they had all had a couple packs of Red Bull! (No worries, don't drink the stuff  so they didn't really) It was probably just the excitement of being at Nanna Jo's, but were they ever wired.
I thought I'd share a fun little project I did to keep them entertained the night before we left. My hubby had already flown to LA, so I was trying to keep them occupied until bedtime.

I found a fun little project online, COLORFUL PASTA NECKLACES! ( I'm trying to find the site to reference it. I'll let you know when I come across it again.)
So to start off, you will need:
dry pasta (with holes for threading)
rubbing alcohol
food coloring
small cups or bowls (for putting the dye in)
spoon, fork, or skewer (to stir dye)
paper towels
dental floss
toothpicks
tape
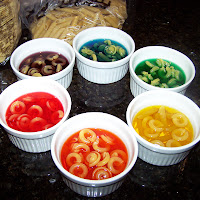
First, I poured a little rubbing alcohol into each ramikin (bowl). Next I dropped about 4-6 drops of food coloring in each bowl. The more that's put in, the darker the pasta becomes. Then I stirred the drops and rubbing alcohol with my skewer until they were good and mixed.

The colors looked so pretty!

Then we dropped the dry pasta into our dyes.
I let them sit in there somewhere between a half hour to an hour. It was amazing how bright they got! After that, I laid out some paper towels on my cookie sheets to let them the pasta dry for an hour. I the mean time we ate dinner and when we were done, voila! This is what we had:

Beautiful, bright pasta!
The kids had a little trouble getting the dental floss through the pasta, so, I decided to tape the end of the floss to a toothpick. Ta da! Homemade needle for little kids. (I also broke the tip of the toothpicks to make them a bit duller so they'd be kidsafe.)


These little guys sure enjoyed it! They're still wearing their necklaces around.
...and...we made it to bed time with the three who used to be 3under3!
Goodnight!
Related Posts with Thumbnails