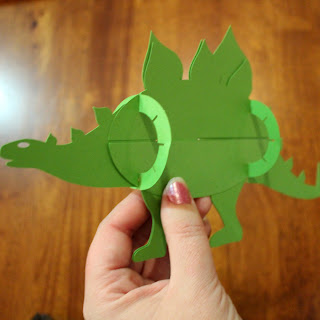
So I thought I had done a 3D Steg tutorial before but can not find it. So here it is again. This dino was released last year and would be a great addition to any dino party or decor.
These are the shapes you should have cut. I will refer to each shape by the number shown in the image below.
To give you an overall idea of how these will go together, 5&6 will fit together, then 3&4. After that, we'll slide the pair 3-4 with the pair 5-6. Lastly, we'll add shapes 1&2. 1 & 2 are actually the exact same shape.
Okay, so to start, grab shapes 5&6 and slide together as shown.
*To be sure that the legs end up in the correct position, be sure that the lower portion 6 (that the legs are connected too) is behind the lower portion of 5 as shown below.
Next, slide 3&4 together as shown.
*Again, be sure that the lower portion of 4 (that the legs are connected too) is behind the lower portion of 5 as shown below.
This is what you should now have. I'm going to call the one with the dino head and tail 3-4 since it is made up of 3 and 4 and the other I'll call 5-6.
It's now time to slide 3-4 and 5-6 together.
The lower portion of 3-4 should be behind the lower portion of 5-6.
To place the rings (1 & 2) on the body, you will want to be sure that the slots shown below line up.
Slide one of the rings over the spikes on the tail and fit any of the slots on the ring into the lower tail slot.
Should like the photo below.
Now pull the ring up and over until the slot on the ring the opposite the one you already used is settled into the top tail slot.
This photo below shows that we're using slots that are opposite from each other.
Repeat the last couple steps with the last ring fitting it into the slots near at the head end.
Now comes the tricky part. Carefully tug on the ring while gripping two layers of shapes. Our goal here is to nudge them around the ring to their own slots.
I like to work one side of a layer and then the next and also work one ring and then the other so there isn't too much pulling on the rings.
The photo below shows what I meant above by working on one ring and then the other, and then back to the other to reduce pull on the rings.
Once you've accomplished the task of filling each slot of the rings, you're almost done! You could leave your stegosaurus as is, but I think his stance is a bit wide for my liking.
To fix this, simply bend the legs in a little, and your done!
As always, if you have questions about any of this, leave a comment and I'll try to answer it best I can as soon as I see it.


Hi! Have you posted a tutorial for your ribbon-wrapped box yet? I just downloaded it and would love to have tips for sizing and assembling. Thanks!
ReplyDeleteWhere can I find the cutting file for this Dino.
ReplyDeleteIn the online Store of Silhouette Studio I cannot find this file.
Martine, In the search field at the top right, type in Dinosaur. Then click on "3D crafts" in the filter options on the left side bar. This should bring up two of Cali's dinosaur boxes and this 3D dino. Let me know if you still can't find it.
ReplyDelete