
I'm going to show you how I made this fun Valentine's banner. Use this tutorial to make your own birthday, christmas, just for fun banner! The possibilities are endless!

I first set up my file as shown below. The size* I've used for my each flag of my banner is
WIDTH: 4.27"
HEIGHT: 5.34"
My file size is 6" x 12"
(if using Robo Master, you can change this in FILE>Document Settings.)

*I chose the size I did because it's the largest I could do and still fit in on a half sheet of 12x12 patterned paper.
After setting up the file, I got ready to cut the banners out of regular white cardstock.
My mats are well used and loosing their "sticky". To be sure that the CS isn't going to slide around while the machine is going, I use the scraper that Silhouette sells. (I bought mine back when they were owned by Quickutz, new ones won't have this logo.)


If you don't own a scraper, just use a plastic gift card or credit card. Using pressure, rub over the paper to ensure it's nice and stuck to the mat.
Now I'm all ready to cut the white CS. These are the settings I use to cut my cardstock. You may find other settings work best for you, but if you're having trouble, you can try these.

I've cut my banners from Cardstock.

I'm now going to take a 12x12 sheet of patterned scrapbook paper and slice it in half so I have two 6x12 sheets.
My mats are so used that I can place thinner paper on them without having to worry about ripping or curling when removed. If you have problems with ripping or curling though, I would recommend using the clear mat that is made for thin material. Here are the three types of mats Silhouette sells:

To cut the patterned paper, I've switched my blade cap to the yellow cap and changed my settings to a thinner preset. Used my scraper or plastic card to ensure my paper is stuck to my mat, loaded it into my machine and cut the same banners I cut out of my CS. 

Time to assemble. Simply use your favorite type of scrapbook adhesive to tack the patterned paper on the cardstock, line up the two pieces and voila! You're finished with that flag. Repeat for every flag you wish to be patterned.


Take two flags and slide the "T" of the right one into the "C" of the left one like this:


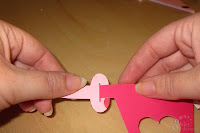
I repeated this for each flag. It would have been quite long if I had done "Happy Valentines" as one banner, so I split mine into two. The end pieces work the same way as the flags. You can then take ribbon and tie it through the looped end pieces.


If you have any questions about any of this, leave a comment here or on facebook! I'll try to get to it as soon as I can.
Enjoy!


