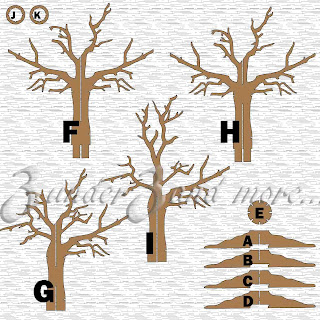
Part 1 - Stump assembly
To start, take "A" and "C". Slide A into the top slot of C like this:

Set it aside.
Next, slide "B" into the bottom slot of "D" like this:
Now, take the first set of A&C and slide it into the top slot of B&D like this:

Line A-D up and fit your disk (E) into the slot.
Next, carefully spread A-D around the disk (E).
TIP: Looking from above, Take two from the 12 o'clock position and move to the 3 o'clock position.
Next, move two from the 6 o'clock position to 9 o'clock.

Spread the rest out from there.
Set your tree stump aside.
Part 2 - Branch assembly
Reminder: Here are the pieces you will create for the 3D tree.
Set it aside.
Next, slide "H" into the bottom slot of "I" like this:
Now, take the first set of F&G and slide it into the bottom slot of H&I like this:
TIP: To line all four layers up, I slide my fingernails in the slots.
Slightly bend your branch pieces (F,G,H,&I) to fit it in the center of the first ring and slide the ring to the top slot:
Do the same thing for the bottom ring.
Spread the branches around like you did the stump...and ta da! It should look like this:
Place branch part over stump. You want the tabs on the branches to be every other "V" section.
TIP: I get the back to two tabs where they need to be and then work on the front two. Seems to help.
Once in place, slide down together.
And you're done!
Here's my graveyard scene:
Enjoy!


