Pages

It's candy time with a little bit of egg!

Easter is in two days. Here's a quick gift tag I made for my candy dispenser I'm giving to friends. I'll also show you how I packaged the dispenser for giving away!
If you haven't already, go to the Silhouette Online store, and purchase this design I made a few weeks ago:

I am making 3 tags, so I cut 3 of the plain eggs and 3 of the patterned eggs. I brushed an ink pad across the edges of the plain eggs to give them some character. (I used Versa Color in 183 Cement on white cardstock if you were wondering.)

I added the patterned eggs I cut earlier from my blue cardstock.

Then punched holes in them to make tags. I had intended to added circles to my eggs before I cut them so my Cameo could do the work, but forgot. So I just went old school and used a hole punch.

 Since these are for the candy dispensers, I made sure to mention to my friends to break the paper band off that holds the dispenser closed. 

So all I did to keep the candy dispenser closed was cut a strip off of my scraps from the box and formed it into a ring that fit around my box. I decorated the band with another strip of the accent paper. Easy peasy! 

Then I took the lid off my box, closed the dispenser bucket, and slid the band over... 

...filled it with candy, (one package of large Robin Eggs, minus 4 eggs, fills a dispenser perfectly)...

...and added my egg tag!

Have a happy Easter everyone!


Candy Dispenser Tutorial


This tutorial is for the cut file found in the Silhouette online store
To make this box, you must purchase file #26692
These files can only be use with the Silhouette cutters. If you are interested in this file for other cutters, please contact us at info(at)snapdragonsnippets(dot)com. 
Please do not share this file. Thank you!

These new boxes are a little different than earlier ones in that I've included contrasting shapes if you'd like them. They inset about a .25 inch if cut to original size. When your design comes into Studio, it will be set up as follows:


*CONTRASTING SHAPES are grouped together at the top. (These are labeled with a "C" for contrasting, and then the shape they correspond to. 
For example: "C-1a" corresponds to the first panel of shape "1". And "C-L1a" corresponds to the first panel of "L1".) 
If you are not interested in adding a contrast to your Tea box, just select and delete. (In some versions of Studio, you must ungroup the design at least twice for it to work. Not sure why, just one of those flukes I guess.)
*LID SHAPES are in the grayed area on the bottom left. Labeled in the diagram with an "L".
*SHAPES FOR THE BODY of the box are what remain in the middle.
Now to get started, I crease all folds toward the inside before I even begin assembling.It makes things easier as I go along.
LID ASSEMBLY
1. So to start with grab shape "L1" and "L2". connect tab as shown in the second photo below. Be sure that the large flaps are all on the same side. (We'll use these in the next step, so if you aren't sure which flaps I'm talking about, you may want to scan ahead. Also, in the 1st photo below, they are the bottom flaps.)


Connect the opposite tab of "L1" to the other side of "L2" to create a square ring. 


2. This is where we use the large flaps. Once you have your "ring" made, simple fold the large flaps inward and secure with adhesive. The purpose of these is to reinforce our opening. If you don't like them, cut them off. But I think it makes the box sturdier and the lid slide on and off more smoothly.

This is what you should have at this point:


3. The last step in the lid is to fold the available square from "L1" down, and then adhere the cap (L3) centered on the top.

And your lid is done!


BOX BODY ASSEMBLY
1. To start, adhere the long tab of "2" to the long side of "1" once again, making sure that your large tabs are on the same end for both pieces. 


Like the lid, adhere the other long tab of "2" to the other side of "1" to create a ring. 


2. Just like on the lid, once you have your "ring" made, simple fold the large flaps inward and secure with adhesive. You should now have this:


3. Now you will need to add the bottom of the box. Take what you've done in the last 2 steps and add "3" to the tabs you have still available on the bottom as shown: 


3. Next, tuck the dispenser sides inside and into the slits on the sides as shown below. 


2. Once "3" is in place, all you have left to do is add cap "4" centered on the bottom. 

Slide on your lid and you have now made your candy dispenser! 
This still looks a little plain to me.
To finish, adhere the contrasting pieces to their respective panels. 

And you have your beautiful candy dispensing box ready to be filled with those yummy treats.

~Paper used in this demo is from Bella Blvd's "Spring Flings and Easter Things" line. See more from Bella Blvd HERE.

Tea Dispenser Tutorial


These new boxes are a little different than earlier ones in that I've included contrasting shapes if you'd like them. They inset about a .25 inch if cut to original size. When your design comes into Studio, it will be set up as follows:
*CONTRASTING SHAPES are grouped together at the top. (These are labeled with a "C" for contrasting, and then the shape they correspond to. 
For example: "C-1a" corresponds to the first panel of shape "1". And "C-L1a" corresponds to the first panel of "L1".) 
If you are not interested in adding a contrast to your Tea box, just select and delete. (In some versions of Studio, you must ungroup the design at least twice for it to work. Not sure why, just one of those flukes I guess.)
*LID SHAPES are in the grayed area on the bottom left. Labeled in the diagram with an "L".
*SHAPES FOR THE BODY of the box are what remain in the middle.

Now to get started, I crease all folds toward the inside before I even begin assembling.It makes things easier as I go along.

LID ASSEMBLY
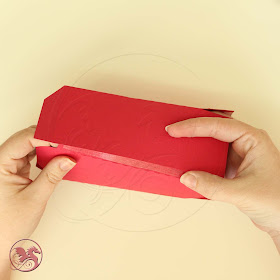
1. So to start with grab shape "L1" and "L2". connect tab as shown below. Be sure that the large flaps are all on the same side. (We'll use these in the next step, so if you aren't sure which flaps I'm talking about, you may want to scan ahead. Also, in the photo, they are the ones under my left thumb.)

Connect the opposite tab of "L1" to the other side of "L2" to create a square ring. 


2. This is where we use the large flaps. Once you have your "ring" made, simple fold the large flaps inward and secure with adhesive. The purpose of these is to reinforce our opening. If you don't like them, cut them off. But I think it makes the box sturdier.


3. The last step in the lid is to fold the available square from "L1" down as shown, and then adhere the cap (L3) centered on the top.


BOX BODY ASSEMBLY
1. To start, adhere the long tab of "2" to the long side of "1" once again, making sure that your large tabs are on the same end for both pieces. 


Like the lid, adhere the other long tab of "2" to the other side of "1" to create a ring. 


2. Just like on the lid, once you have your "ring" made, simple fold the large flaps inward and secure with adhesive. 


3. Now you will need to add the bottom of the box. Take what you've done in the last 2 steps and add "3" to the flaps you have left. Be sure on this step that when you adhere "3" that you are using the larger end. It really is only larger by about a eighth to a sixteenth of an inch, but it's important. 


3. Next, fold the small end of "3" that is still available and fold it inside your box and adhere over the tabs of shapes "1&2" as shown. The purpose of this, is to hide our tabs from view and to give a sturdier base. 


2. Once "3" is in place, all you have left to do is add the cap "4" centered on the bottom. 

To finish, adhere the contrasting pieces to their respective panels. 

And you have your beautiful tea box ready to be filled with those fragrant packets.

~Paper used in this demo is from Samantha Walker's "Blossom" line. See more from Samantha HERE.